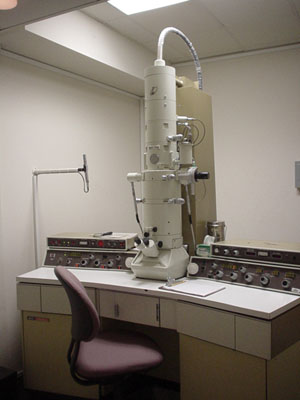
1200EX Electron Microscope

Printable Version Here
This is a transmission electron microscope max at 120 kV.
OPERATING INSTRUCTIONS FOR JEOL 1200EX
Check for the following:
- Green Ready lamp is lit.
- Beam Current reads 000 or 046. (If Beam Current is blank, open upper left panel. Move lens power supply switch to On and accelerating voltageswitch to operate).
- Accelerating Voltage is at 80.0 kV
- Mag is at 5,000x
- Photo number on the phot log corresponds with the photo number on the display screen.
Load Sample:
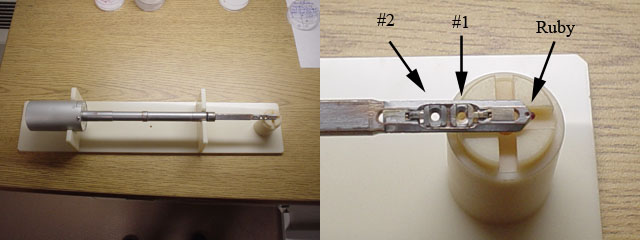
- Load samples in sample holder (#1 is closest to ruby).

- Align sample holder with insertion hole. The top of the sample holder will be facing the operator.
- Insert fully without turning.
- Firmly press the sample holder toward column until you hear the vacuum pump engage AND the red lamp lights up next to insertion hole.
- WAIT until red light goes OUT and pump recycles.
- Turn 1/4 turn clockwise and control sample holder speed as it is pulled into column by the existing vacuum.
(Rotating Holder: Plug into H1 pin connector).
- Dial in sample position 1 or 2.
- Turn up CRT intensity.
- Depress mag 2 (mag = 5,000).
- Set accelerating voltage to 80 kV.
- Depress HT button. Wait until Beam Current stabilizes @ 046. (If a different working kV is desired, call a member of the facility.)
- Slowly increase filament knob to the stop.
- Condense the beam with brightness knob (counter-clockwise).
- Center beam with SHIFT X/Y knobs if necessary.
- Spread the beam using brightness knob.
- Focus the binoculars on the pointer (black dot). Small screen must be in lowered position.
- Focus the image using the image x wobbler.
18. Adjust the Z axis.
Z Axis Adjustment:
- Mag at 5,000, image in focus.
- Place a small, easily identifiable object at the screen center.
- Disengage the goniometer stage drive.
- Rotate knurled ring on goniometer counterclockwise 15o.
- Observe the movement of the selected object.
- Using the small knurled knob on the goniometer, bring the selected object back to screen center.
- Return goniometer tilt to 0o.
- Center selected object with stage controls.
- Focus image.
- Repeat steps 4 thru 9. (When the selected object remains at screen center during tilting, the Z axis is properly set).
- Engage the goniometer stage drive.
Photography:
- Select the desired field and magnification, focus the image.
- Select either full screen or small screen exposure meter.
- Adjust brightness knob to set EXP TIME to 2.8 seconds.
- Depress photo button (wait until button lights up).
- Depress photo button again (when exposure is complete, the image will reappear on the screen).
- Record all pertinent information on the Photo Record Sheet.
Remove Sample:
- Turn brightness knob clockwise until screen is dim.
- Set filament to zero.
- Set goniometer tilt angle to 0o. (Rotating Holder: Unplug H1 pin connector).
- Pull sample holder straight out to the stop.
- Turn 1/4 turn counterclockwise.
- Pull straight out to remove from column.
Standby:
- Turn brightness knob clockwise until screen is dim.
- Filament knob set to zero.
- Remove sample.
- Set accelerating voltage to 80.0 KV.
- Depress HT button (beam current reads 000).
- Turn down panel light and CRT intensity.
- Turn off room light.